No SSL Certificate = Website Not Secure?
Google will flag your website this Year!
No SSL Certificate => Website Not Secure! Share on XIn July 2018, with the release of Chrome 68, Google is making it official: If your site doesn’t have a valid SSL Certificate and you don’t serve your content over HTTPS, visitors will see a warning, marking your site as ‘Website Not Secure!’.
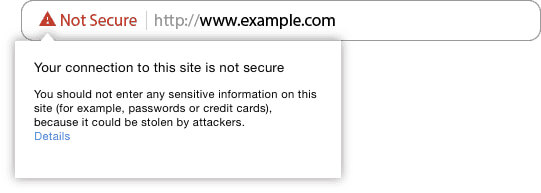
The ‘Not Secure’ warning, for non-HTTPS websites, will appear in the address bar of Chrome and implies that the website is not secure or dangerous for users.
- This warning can confuse your site visitors and lead them to believe that there are security issues with the website.
- No doubt the warning will seriously impact the bounce rate of pages on your website.
Who uses Chrome anyway, I hear you say?
Well according to StatCounter, over 55% of global internet users favour the Chrome web browser.
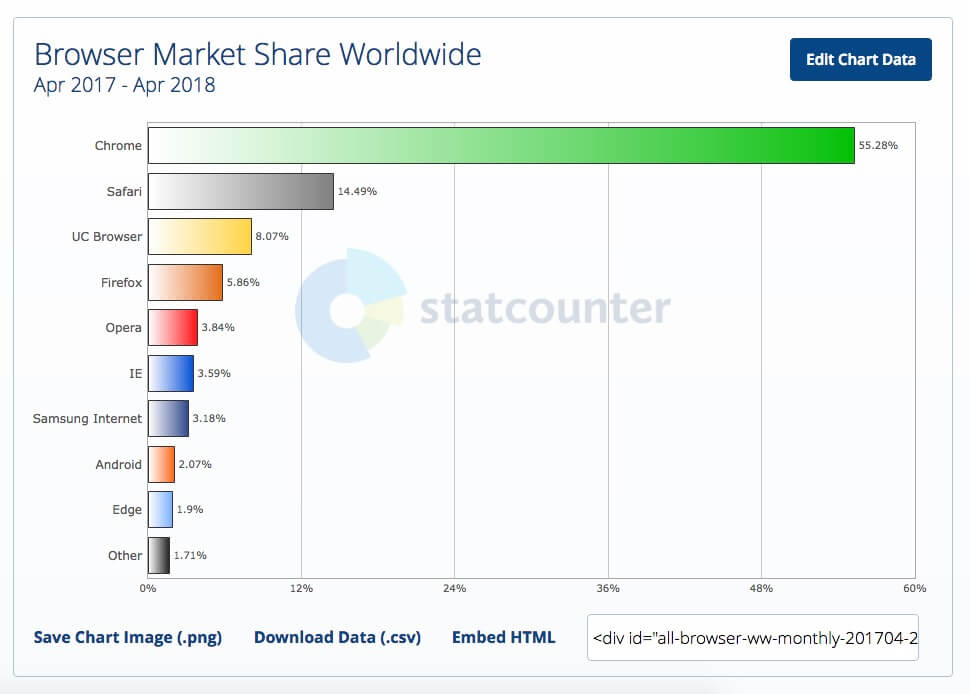
Besides that, Firefox, Safari, Opera and Internet Explorer are all following Google’s lead in pushing for the improved security protocol.
Eventually all websites serving content over HTTP will be flagged as insecure regardless of what browser your visitors are using.
Do You Need to Worry About SSL?
1. Does your website URL start with http://
2. Does your website accept any form of text input –
- Newsletter Signups
- Login Portals
- Contact Forms
- Search Bars
If you answered YES to either question, you need to install an SSL Certificate and configure your site to use HTTPS in order to prevent your site visitors having to click through a Website Not Secure warning message to access your site.
How to Remove Website Not Secure Warning
So, how do you remove the ‘Website Not Secure’ warning for your website.
TL;DR – Simple really, you must obtain and install a SSL Certificate for your site, and configure it to serve all of your content, pages, images etc. over HTTPS!
It’s not terribly difficult, but it’s not a 5 minute procedure either and there are a number of options to consider.
For those interested in an explanation of the SSL/Security Protocol, Read on…
Can’t be bothered and just want to get your site fixed, click on the link below and get right into it…
What is an SSL Certificate?
SSL (Secure Sockets Layer) Certificates are like an electronic passport for your website.
They’re small data files that digitally bind a cryptographic key to an organisations details.
Once installed on your web server, it activates the Secure Padlock and the HTTPS Protocol and allows a secure encrypted link between your web server (Where your website files are located) and the web browser on your devices.

Without an SSL Certificate, a secure connection cannot be established, so any information transmitted will not be digitally encrypted and so be vulnerable to nefarious types intent on stealing it!
Why are SSL Certificates Important?
1) Encryption of Sensitive Information
The information you send on the Internet is passed from computer to computer to get to the destination server. Any computer in between you and the server can see your credit card numbers, usernames and passwords, and other sensitive information if it is not encrypted. When an SSL Certificate is used, the information becomes unreadable to everyone except for the server you are sending the information to.
2) Combatting Global Cyber Crime
SSL Certificates and encrypted information help to combat organisations and individuals involved in global cyber crime and identity theft.
3) Trust and Credibility
An added bonus of SSL is that when your site visitors and/or customers visit your site, the visual icons provide confidence that a trusted encryption system is in use.
![]()
4) Boost Your Google Ranking
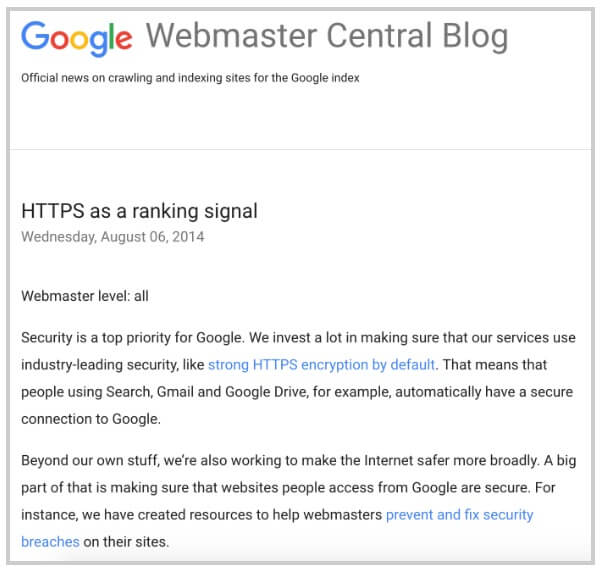
Google has confirmed that the use of SSL and HTTPS is a ranking factor in it’s Search Engine Results Pages; should be no argument there…
Types of SSL Certificates
There are several types of SSL Certificates to choose from based on the validation requirements and the number of domains to protect.
The level of encryption is the same for each certificate, the differences being the level of verification required for each and the appearance of the secure URLs in your browsers address bar.
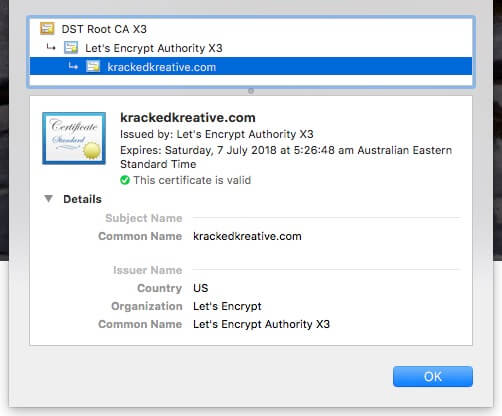
1) Domain Validated Certificates
A Domain Validated Certificate is designed to protect a single domain or subdomain. Validation involves the Certificate Authority verifying that the organisation has control / ownership of the domain to be protected. This is typically done by making changes to a DNS Record or uploading a file to the root directory of the website.
Time to complete is usually less than an hour and expense is typically minimal.
![]()
2) Organisation Validated Certificates
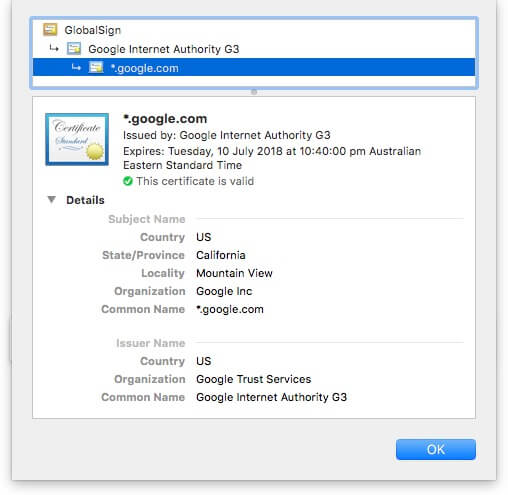
An Organisation Validated Certificate gives your site a step up in credibility.
Validation involves the Certificate Authority verifying the –
- Ownership of the domain, and
- Basic organisation information such as name, city and country.
These types of certificates are a little more expensive and can take a few extra days due to the additional checks involved.
Visually, a site will display the secure browser padlock and the organisations details will appear in the security certificate along with the issuing Certificate Authority.
3) Extended Validated Certificates
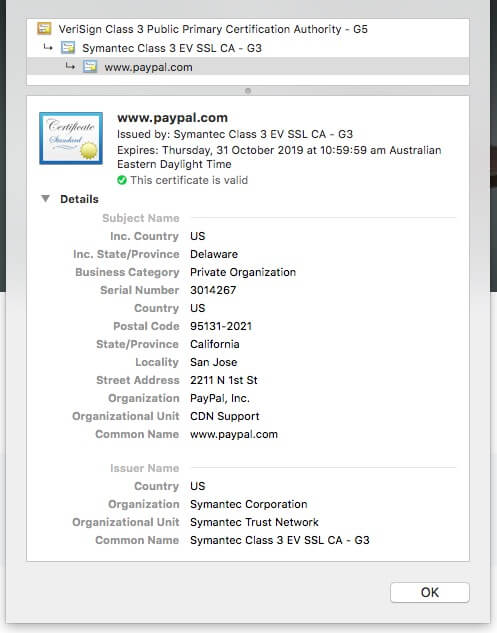
Extended Validated Certificates offer the highest level of validation available today, lending even more credibility and trust to your organisation.
Validation involves the Certificate Authority verifying company documents to categorically establish –
- Ownership
- Organisation Information
- Physical Location, and
- Legal Existence of the Organisation
As well as confirming that the organisation is aware of the request for the SSL Certificate, before approving it.
The cost is obviously higher for this type of validation and the time frame involved can be several weeks.
![]()
In addition to these, you can also get certificates to cover your subdomains and/or multiple domains.
These include –
Wildcard Certificates:
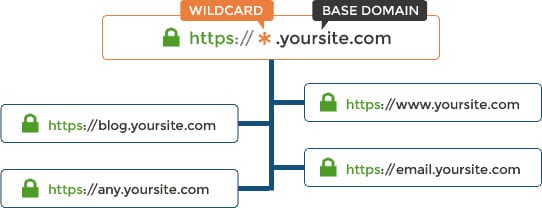
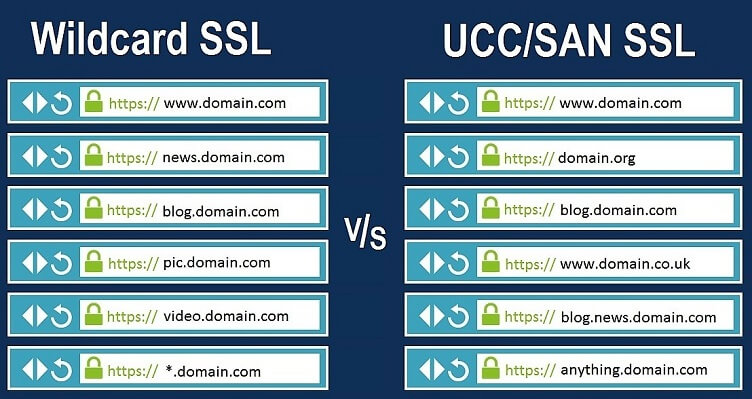
Wildcard Certificates protect an unlimited number of subdomains for a single domain. This is a great solution if you manage multiple sites / pages linked to the primary domain.
It will work for any subdomain of the primary domain https://www.yoursite.com; but it won’t work on https://www.yoursite.com.au.
Multi-Domain Certificates:
Multi-domain or SAN Certificates allow you to protect up to 100 domains with the same certificate.
Whilst originally developed for Microsoft Exchange and Communications Server Environments, they can be of benefit to anyone looking for the simplicity of consolidating multiple primary domains and subdomains into a single SSL Certificate and IP Address.
How to Choose a SSL Certificate
There is a SSL Certificate and security solution to suit everyone.
Your individual needs will depend on –
- Budget
- The Level of Trust Required
- The number of domains to be secured
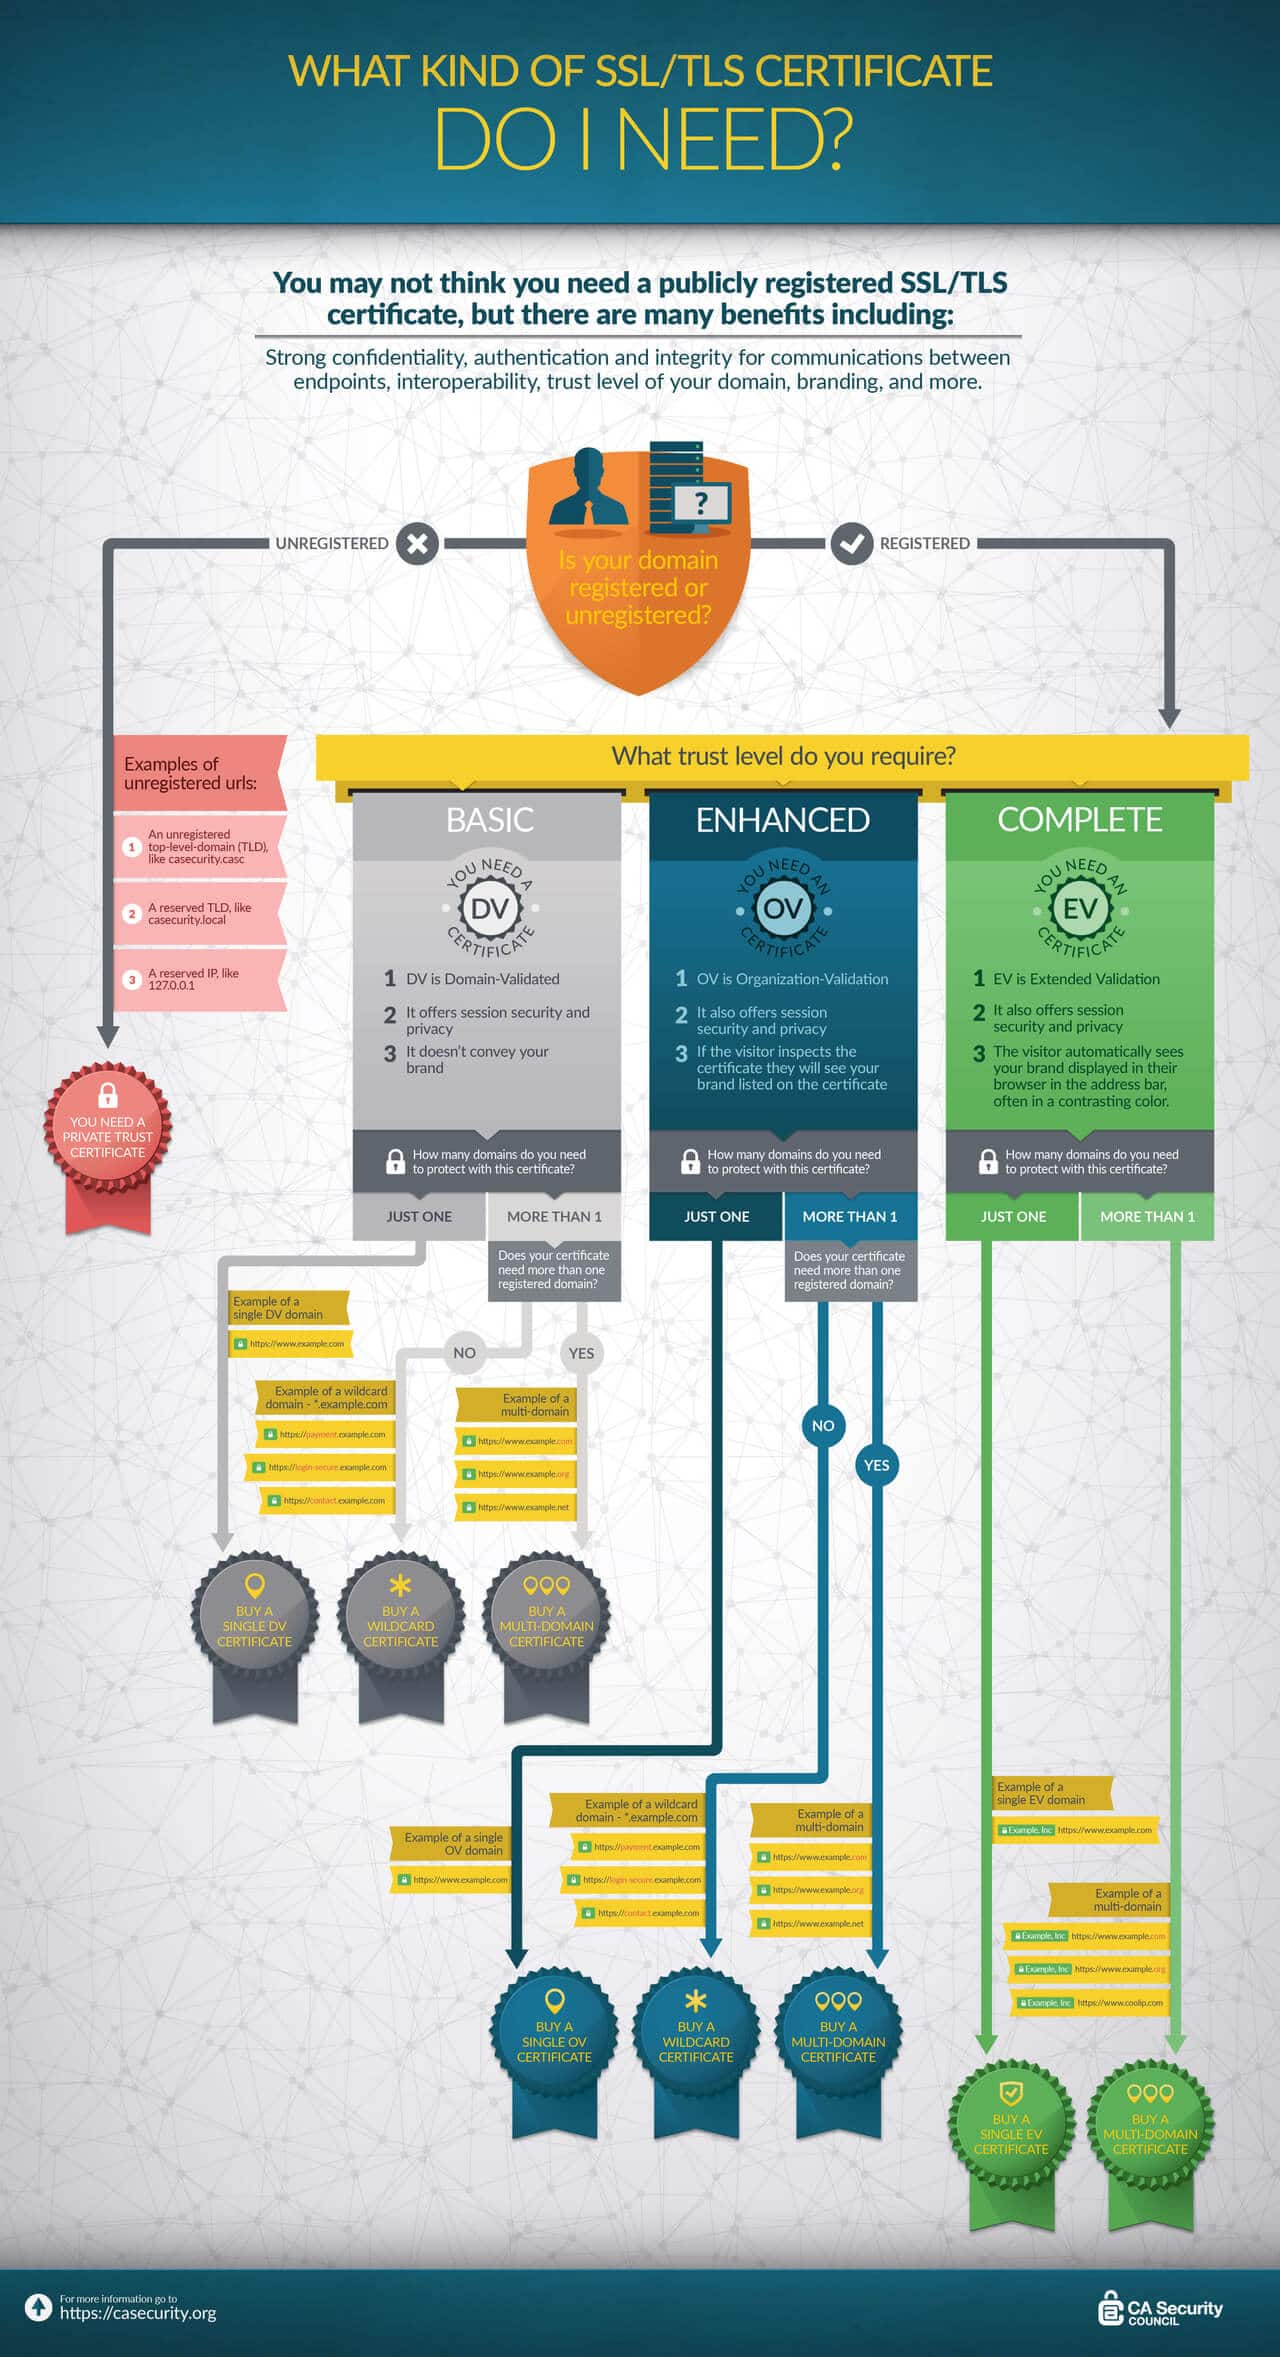
This infographic from the CA Security Council (CASC) may help to simplify the decision making process. If you click on the image below, you’ll be able to see a much larger version.
How to Choose a SSL Certificate Provider
This is where the fun really begins…
Type SSL Certificates into a search engine and you’ll likely get over 10 million results!!

So where do you start?
Since SSL Certificates are a web security product, I suggest starting with your web host. Most if not all web hosts will offer a range of SSL Certificates, priced according to the level of trust and validation as described above.
More and more web hosting providers are also offering FREE SSL Certificates from Let’s Encrypt and Cloudflare

Let’s Encrypt is a FREE, automated, and open Certificate Authority that offers a painless means to obtain an SSL Certificate for your website. Several companies including Google (Chrome) Mozilla (Firefox) Facebook and Automattic (WordPress.com) have sponsored the project.
SSL Certificates used to be really expensive, but with the introduction of free options like Let’s Encrypt, paid SSL Certificates have come down in price and they do offer additional features, security seals etc.
I’m not suggesting that a paid option is the way to go, but that there are options for you if you need the additional features.
Most, if not all small business websites and personal blogs etc. will be fine with a FREE SSL from either Let’s Encrypt or Cloudflare.
The link below will give you a list of all of the web hosting providers that support FREE certificates from Let’s Encrypt.
Web Hosting Providers Who Support Let’s Encrypt
My web host doesn’t offer FREE certificates!
If you can’t find what you want from your current host, you still have a number of options –
1) Change Web Hosts –
- Not as scary or drastic as it sounds, particularly if there are other aspects of your web hosting that are less than optimal for your website needs, and
- There’s no sense in getting ‘locked-in’ to paying $99/year for a single DV(Domain Validated) Certificate if a free certificate from Let’s Encrypt is all you need.
If you’re contemplating changing web hosting, send me a message, so I can provide some one-on-one advice and possibly save you some $$$.
2) Buy a Certificate
- Research and choose a certificate from one of the many vendors competing for your business in the SSL marketplace, and install/configure that certificate on your web hosting account.
- You may need assistance from your web host to install and configure your certificate
NOTE: SYMANTEC ISSUED SSL Certificates –
Thanks to a decision by Google in September 2017, to stop trusting Symantec-issued SSL/TLS certificates, from mid-April 2018 Chrome browser users visiting websites using a certificate from the company, issued before June 1, 2016 or after December 1, 2017 will be warned that their connection is not private and someone may be trying to steal their information. They will have to click past the warning to get to the website.
PS: Mozilla’s Firefox will also distrust Symantec-issued certificates from version 60 onwards, due out in May 2018.
Of course, not everyone uses Chrome and not everyone will instantly upgrade to the latest version, but it’s safe to say that it will become a big headache very quickly for those site owners that haven’t obtained new certificates from other authorities.
How to Install & Configure an SSL Certificate
In most cases installing a SSL Certificate is as simple as logging into the admin area of your web hosting account –
- Buy a certificate from your web host, upload a certificate purchased elsewhere or choose a free certificate if available
- Activate the certificate
- Install the certificate on the domain/s to be secured
- Configure your site to use HTTPS.
What’s HTTPS?

Firstly, HTTP – ‘HyperText Transfer Protocol’ is the method by which data is transferred around the web. It’s fast but insecure.
HTTPS – ‘HyperText Transfer Protocol Secure’ (or “HTTP over SSL”) is the latest internet standard for secure communication between your browser and any web server.
In essence, the Secure Sockets Layer (SSL) — or its newer form Transport Layer Security (TLS) — connection is established first, thus ensuring encryption for all data, then the normal HTTP data is exchanged over this secure SSL/TLS connection.
How to Configure Your Site to Use HTTPS
On the surface, configuring your site to use HTTPS is pretty straightforward –
1) Change all of the URLs on your site from HTTP to HTTPS
- This will ensure you have no broken links once you install and activate your SSL Certificate
- The best way to do this is to run a Search & Replace over your site’s database; just be sure to take a backup first
- I highly recommend Better Search Replace or WP Migrate DB for doing this.

2) Set up Permanent 301 Redirects, from HTTP to HTTPS so that –
- Search engines get notification of your websites new addresses, and
- Anyone who has previously book-marked any of your web pages are automatically redirected to the new HTTPS address.
- I don’t recommend relying on a plugin to do this, It’s much cleaner to implement at the server level, especially if you are dealing with hundreds of URLs.
Depending on your server configuration, you would add the code as below.
Nginx
Add the following to your Nginx config.
server {
listen 80;
server_name domain.com www.domain.com;
return 301 https://domain.com$request_uri;
}
Apache
Add the following to your .htaccess file.
RewriteEngine On
RewriteCond %{HTTPS} off
RewriteRule (.*) https://%{HTTP_HOST}%{REQUEST_URI} [R=301,L]
3) Fix Mixed Content Warnings

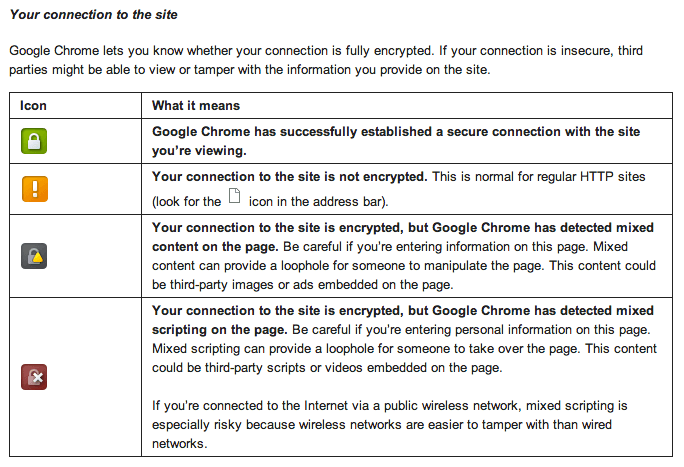
Mixed Content Warnings occur when a browser loads a web page containing content such as images, media files or scripts from external locations over a HTTP connection and not HTTPS.
For example –

There are two ‘mixed content’ scenarios to be aware of:
- Mixed Active Content (or Mixed Scripting) – in this scenario, the site loads a script using an insecure connection. Web browsers will block this type of potentially dangerous content completely.
- Mixed Passive Content (or Mixed Display Content) – here, the site loads an image or audio file over an insecure connection. As the content is “passive” (that is, not a script or other executable), web browsers are not as strict with blocking it. However, it can trigger warnings, destroying visitor confidence.
Finding Mixed Content –
An easy to use resource for finding mixed content on your site is to run the problematic pages on your site through an online testing tool such as Why No Padlock?
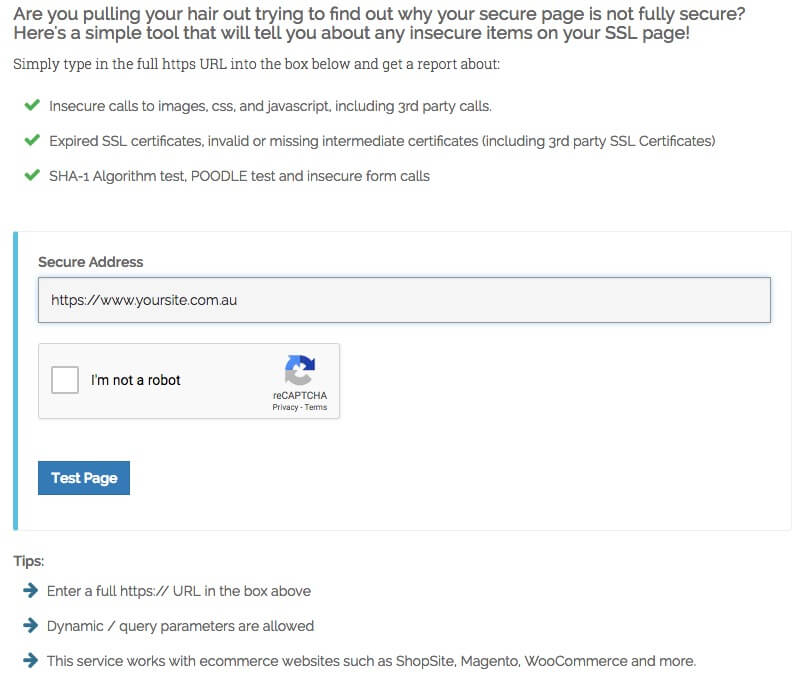
Why No Padlock? will uncover insecure calls to images, CSS stylesheets, scripts and other resources, so that you can manually fix them.
Another option is to use a plugin like Really Simple SSL.
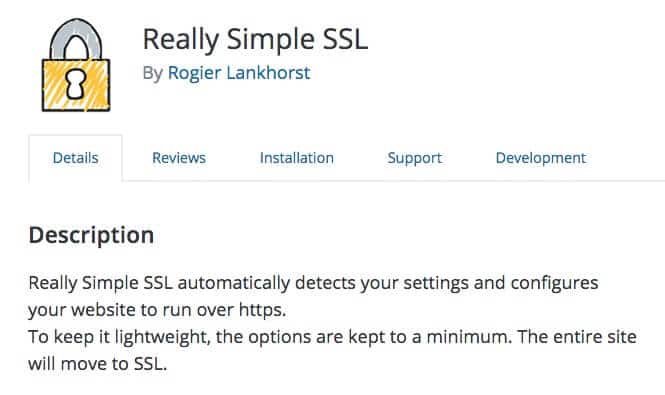
Simply install the plugin on your site, activate it and follow the setup instructions.
The plugin will –
- Change your Site URL and Home URL to HTTPS
- Initiate a WordPress internal redirect to ensure that all incoming requests are redirected to HTTPS
- Dynamically fix any Mixed Content Warnings by replacing all HTTP:// URLs with HTTPS:// (No changes to the database are made)
NOTE: The plugin doesn’t physically change your site content, so if you choose to use this option, you need to keep the plugin active on your site forever. If you deactivate the plugin your site will revert back to HTTP.
In my opinion this is a good short term option for site owners who are not comfortable to tackle a full HTTP to HTTPS migration, however it’s a bit like putting a band-aid over a serious illness; at some point the illness will need to be addressed properly.
4) Implement HSTS (HTTP Strict-Transport-Security)

HTTP Strict Transport Security (HSTS) is a web security policy mechanism that allows a website to tell ALL web browsers that it is ONLY accessible over HTTPS, NEVER over HTTP.
You may be asking yourself “Haven’t we just done this with SSL and HTTPS?”
Not quite.
Imagine the below scenario –
You’re at the airport using the free WiFi and use a previously saved ‘bookmark’ to access your favourite online shopping site (Which recently switched to using HTTPS). Your browser attempts to visit http://myfavouriteshop.com then gets redirected to https://myfavouriteshop.com. All good yes?
However, a hacker intercepts the original insecure HTTP request and redirects you to a clone of your shopping site, where you innocently enter your login details; this is called a ‘Man in the Middle Attack’.
The hacker now has your access details to the real shopping site and can compromise your account.
Strict Transport Security resolves this problem as long as you have accessed the site over HTTPS at least once and the site actively enforces Strict Transport Security. Your browser will simply refuse any request to access the site over HTTP, which prevents hackers from using this form of ‘Man in the Middle Attack’.
To implement HSTS you need to add some code to your sites .htaccess file.

You should set the max-age to 1 year, in seconds and use includeSubDomains if you have subdomains as part of your site structure.
NOTE: Be very careful with using preload! Preload allows you to submit your URL to the Chrome HSTS Preload Site. Once accepted your site will be hardcoded into the Chrome browser as being ONLY ever accessible over HTTPS.
If the security protocol changes in the future or if for whatever reason, you can no longer serve your site over HTTPS, your site will become inaccessible until you get it removed from the list.

5) Configure Google Accounts
When you move your site to HTTPS, you will have to adjust your settings in Google Analytics and Google Search Console accordingly.
At the very least, you will want to add all variants of your domain and submit a new sitemap.
Look out for an article on how to do this; coming soon!
6) Miscellaneous Updates
Following a successful HTTP to HTTPS migration, you will also need to consider the following –
- Modify your Canonical Tags to point to the HTTPS version.
- Update any hardcoded URLs in your robots.txt file
- Revise third-party PPC URLs (AdWords, Bing Ads, FB Ads)
- Update Email Marketing Software URLs (MailChimp, Aweber, GetResponse)
- Make your clients/customers aware of the change to HTTPS and advise them to update their ‘bookmarks’ etc. to the new URL.
- Amend all external links and backlinks as much as possible.
- Update your Social Media links to the site. Don’t rely on the redirect only!!
- Migrate social share counts
Conclusion
As you can see, there is a lot that goes into a successful HTTP to HTTPS migration, but if you allocate some uninterrupted time and follow the steps above, the procedure is easily achievable for anyone comfortable with managing their website.
For small websites, it usually takes a few hours to finish; whereas, for older and larger websites, it may take a few days to finish the migration properly.
I do offer a SSL/ HTTPS Migration service if you’d like me to handle all of the technical aspects for you; just click on the button below and drop me line, or give me a call. I’d be happy to help.
Contact Us for SSL / HTTPS Migration
